How I created a free email course using ConvertKit
I will come right out and admit it - creating an email course was a ton of fun. Designing each email and coming up with the content was a super engaging process and the fact that ConvertKit makes it incredibly easy to put together these courses definitely helped.
By the way, you'll see links to ConvertKit throughout this email, and they are affiliate links. I almost never write these types of posts laden with affiliate links, but I had to make an exception in this case. It's worth it.
Here's my complete review of ConvertKit on my sister blog, Digital Marketing 4 Bloggers.
What is Seva/ConvertKit?
It's an email marketing service. Every newsletter signup form on this web site comes straight from ConvertKit, and I use it to manage all of my email lists. ConvertKit is similar to services like MailChimp and Drip, but I feel it offers the best combination of features for the price.
In other words, it's one of the best values in the business.
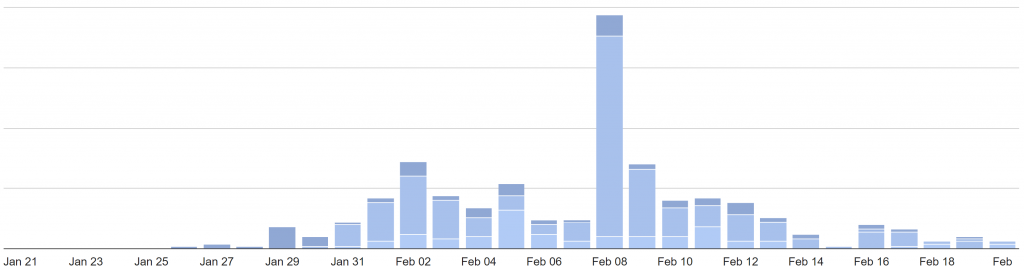
Check out the graph below. ConvertKit displays this graph on your main Dashboard page and it measures email signups each day. That huge spike you see on February 8th was my pre-launch of the email course I designed with ConvertKit. It nearly doubled my email list that day.
Next, I'm going to show you exactly how I used ConvertKit to create my free email course quickly and easily.
How I built my email course using ConvertKit
First, in case you didn't know, I have a free 7-day email course about starting your own money blog. I talk about domain names and web hosting, building an email list, awesome features of Wordpress as well as the pros and cons of blogging anonymously. If you haven't signed up for it, please consider doing so! Maybe I'll love you forever if you do.
In ConvertKit, there's a concept called 'Sequences', and you will need to use this feature to create an email course. For the purposes of this blog post, an email course is a sequence. I refer to those terms synonymously.
As the name implies, these are sequences of emails that get automatically sent to subscribers of the sequence. Think of it as a configurable batch routine. Once it's setup, you'll never need to touch it again (unless, of course, you want to!).
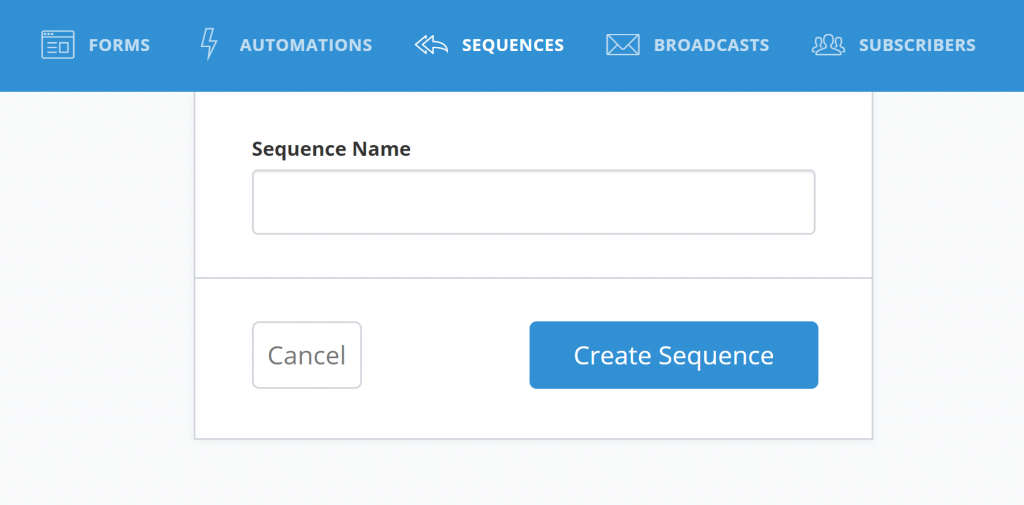
To access the Sequences area, simply click on the 'Sequences' link at the very top of your dashboard - as of this writing, it's the middle link:

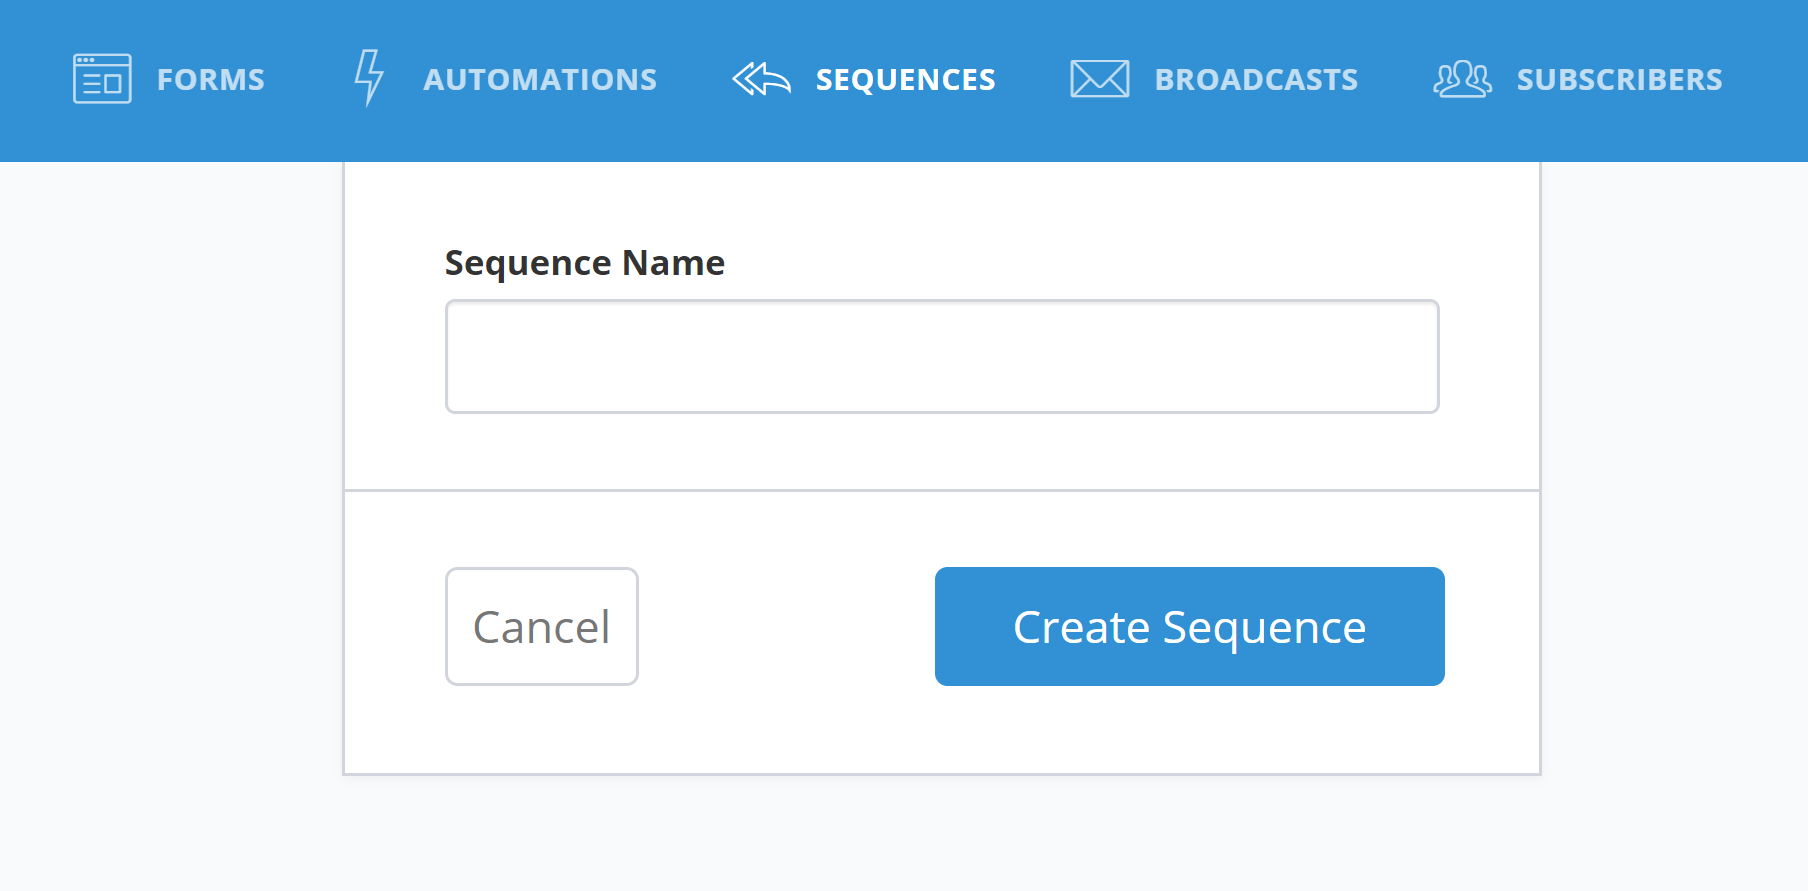
Next, select + Create Sequence on the right to begin a new sequence of emails. The next page asks for a name:
Give your sequence a name, then select 'Create Sequence'.
The next page is where all the magic happens. ConvertKit will automatically build your very first email for you and fill it with some dummy text. This will be a Draft email. Any draft email will not be sent to your sequence's subscribers until the email's status is changed to 'Published'.
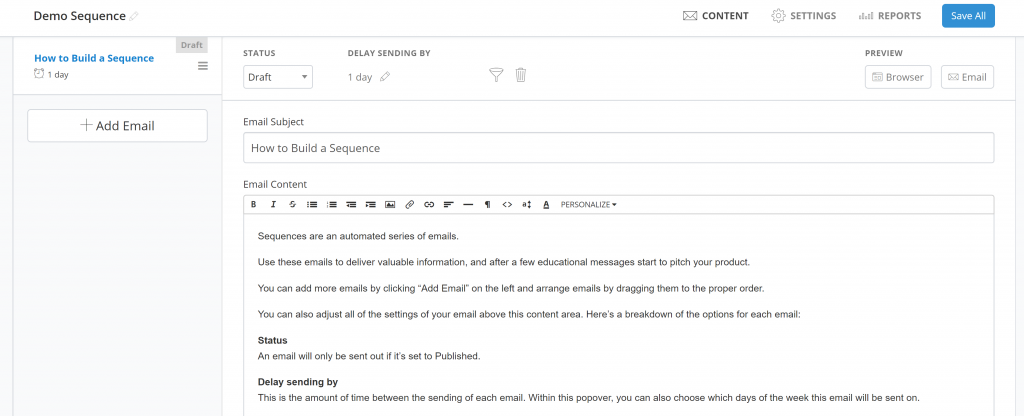
Take note of the different areas of the Sequence screen. On the left, we see each email in the sequence. To add a new email to your sequence, punch the + Add Email button. Emails can be rearranged by clicking and dragging an email on the left to a different spot within the sequence.
Also, the name of the sequence is listed at the top left (in this case, "Demo Sequence"), and it's configurable by clicking on the pencil icon to the right of the name.
Let's take a look at the middle of the screen and discuss each element:
STATUS - The status of an email is either 'Draft' or 'Published'. Draft emails will not be sent to subscribers. This enables you to work on new emails in a sequence without affecting the user experience until the email is ready for primetime. Click on the drop-down menu and select 'Published' to mark this email as "sendable" to all subscribers of your sequence.
DELAY SENDING BY - Setting the email's delay (offset) will change when each email is sent relative to the email before it, and the offset for each email can be configured by clicking on the pencil icon next to this value.
For example, choosing '1 day' will send that email one day after the previous email (if it's the first email in the sequence, it'll send that email one day after a subscriber joins the sequence). The 'Day' option can also be changed to 'Hour'. Days of the week are configurable by selecting them. Unselect Sat and Sun to only send emails on weekdays.

Note: The screenshot above references "after subscription" only because this is the first email in the sequence. After creating another email, it will reference "after last email".
FILTER (icon) - This feature enables in-depth filtering of exactly who should get each email within the sequence (and filters can be different for each email). For example, you might want to only send certain emails to subscribers who possess a particular tag. For the record, I did not use the filtering feature at all in the making of my email course.
DELETE (icon) - This will remove the email from your sequence (after confirmation).
PREVIEW - The 'Browser' and 'Email preview options let you preview the email. Always preview your emails! I always preview each email by using the "Email" option before sending or scheduling. Simply click the 'Email' button, type in your email address (if it's not already there) and check your email.
The Email Subject and Email Content areas should be self-explanatory. Notice the design toolbar at the top of the Email Content area that provides quick access to utilities for your email:

If you use Wordpress (or virtually any online editor), these tools will probably look familiar to you, except for the PERSONALIZE option on the right. This option lets you customize the email on a per-subscriber basis.
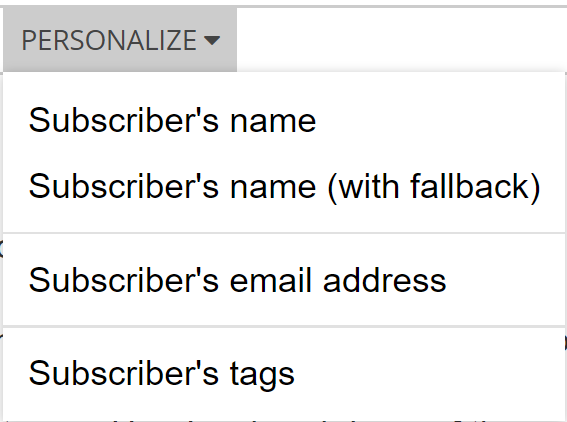
Select a choice and ConvertKit will automatically add the code to your email. Play around with these options to see what works best for your needs. I use 'Subscriber's name (with fallback)' a lot, which gives me the option of customizing the greeting depending on whether or not the subscriber gave me a name when they subscribed.
How subscriptions work
Sequences contain subscribers. A subscriber is an email address that joins the sequence and receives all 'Published' emails within the sequence. All sequence subscribers will also become a part of your overall email list of subscribers (if they aren't already).
Subscribers can be added to sequences in a couple of different ways. The most common way is through a sign-up form that ConvertKit manages. For example, the sign-up form for my 7-day email course automatically adds subscribers who sign up through that form directly to the sequence.
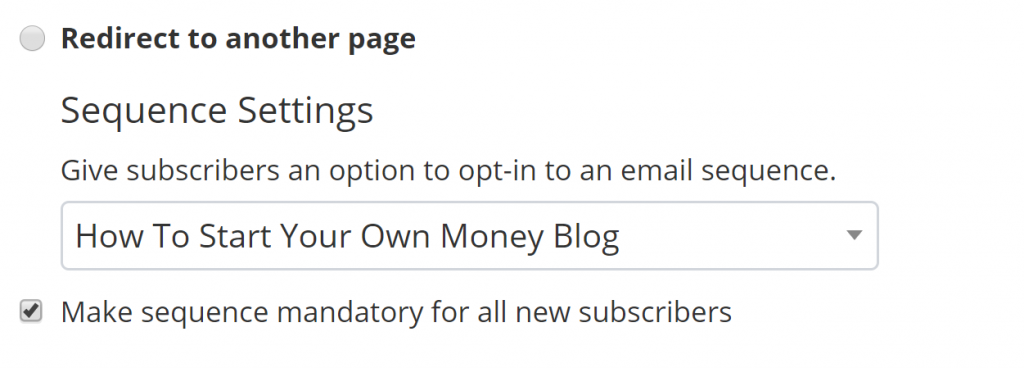
For instance, the screenshot below shows the settings for my email course's sign-up form. I've selected the 'How To Start Your Own Money Blog' sequence. The drop-down box will be filled with every sequence that you create, making the creation of sign-up forms easy.
Alternatively...
Email administrators can also manually add subscribers to a sequence. Once a subscriber is added manually, that subscriber will be treated like any other subscriber that voluntarily signed up through a form and will begin at the very beginning of the sequence.
Once a subscriber completes a sequence (in other words, all emails have been sent to that subscriber), they remain a member of that sequence.
Monitoring Sequence Reports
One of the nicest features of ConvertKit's Sequence capability lies in the reports section. At the upper right-hand corner of a Sequence, three links appear: CONTENT, SETTINGS, and REPORTS. Clicking on the REPORTS link provides insight into how each email is performing. Of course, this will only be useful after releasing the course and people signing up!
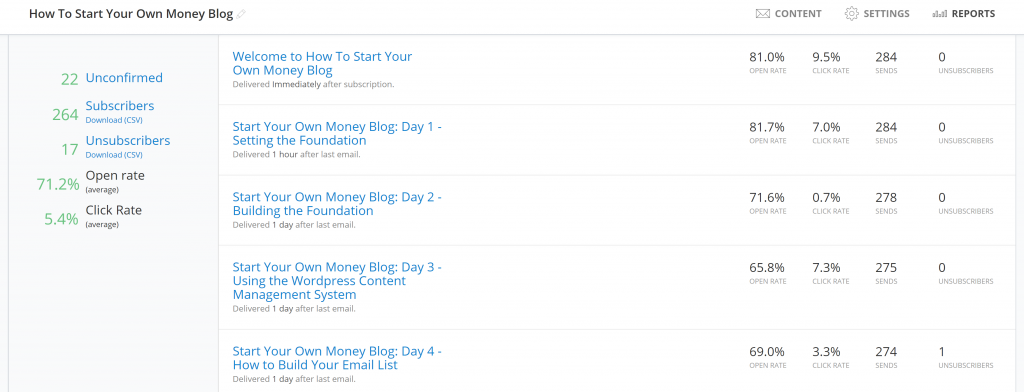
The left-hand side provides higher level numbers for your entire email sequence. The right dives further into each email and how each one performed. The screenshot above comes straight from my free 7-day email course about starting your own money blog.
Click on an email from the Reports page for detailed information about that email, including the specific subscribers who opened the email and clicked on any of the links.
Designing an email course
We all have our own preferences when it comes to writing a whole bunch of text, but here are a few tips and techniques that have worked for me.
A few tips when designing an email course:
- Decide on a clear goal. You can't cover absolutely everything in your course. Decide on a singular topic and hit that sucker hard. Make sure your reader knows what they are going to get before opening the email.
- Your subject line is like your post title, so make it appealing. Even your most dedicated email subscribers won't open every email. Write wickedly appealing subjects for each of your emails to encourage engagement.
- Create the outline before starting to write the actual course content. The outline can help focus your content and assist with references to topics that you talk about in other sections.
- Design a welcome email that's sent immediately after someone subscribes to your course. The welcome email should introduce them to the course and talk briefly about what they will learn. Of course, it should also thank them for signing up! I usually write the welcome email as my last step before releasing the course.
- Don't get fancy! Emails should look like emails, not blog posts. Keep each email simple and straightforward, and not too long (arguably, I broke my own rule here with one of my course emails that's about 2,000 words!).
- Include the essential smart-text design elements: Bold and italics, headings and smaller paragraphs tend to perform better (I talk about this in my email course, BTW). Images are okay but don't overuse them (and make them smaller!).
- Add value. Even though my email course was free, I paid special attention to adding value for everyone who subscribed. I've seen email courses that were only 100-words per email. To me, that doesn't add a lot of value. Make your email course useful.
- Include a call to action (if necessary). What should the user do after reading your email? Nothing? Visit your website? Buy one of your products? Whatever it is, tell them, and be direct.
Create your own ConvertKit account
I used MailChimp for several months before upgrading to ConvertKit, and I'm glad that I did. ConvertKit's user interface is head and shoulders above any other email marketing service I've ever used, and the 'Sequences' capability is a testament to how easy it is to use ConvertKit.